Logo Slogan
Contact | Impressum

Installation

After downloading BixDVD_setup.exe doubleclick it and confirm in the Windows dialog that you want to execute it. Follow the onscreen instructions to install BixDVD. Then do the following:
  1. If BixDVD hasn't been started already (option in setup), start BixDVD from the Windows Start menu. Confirm to Windows that you want to "Run" the application and when Windows shows the "Windows Security Alert" dialog click on "Unblock" (to connect to BioExplorer). Now insert a DVD into the DVD reader and press the play button in BixDVD. You should see the movie on the DVD beeing played in BixDVD's Display window. If playing a DVD works fine, go to step 3.
  2. If playing a DVD is not possible, then check if there is a DVD Codec installed in your system. If you can play DVD's with BioExplorer®, then normally you already have such a Codec installed. In that case BixDVD usually works fine.
    If not, the problem might be corrected by installing a new Codec. There are several suitable Codecs on the market, some of them are freeware (e.g. DScaler5008, download it from here). More suggestions you may find here.
  3. In order to work with BixDVD, the designs in BioExplorer® have to be slightly adapted. This is described in detail here.
  4. For loading an ISO file BixDVD needs a utility called Virtual Clone Drive. This software is freely available from
          http://www.slysoft.com/de/virtual-clonedrive.html
    or can also be downloaded here.
After Installation you can start BixDVD from the Windows Start menu.

Adapting BioExplorer® Designs

In order to use BixDVD as a feedback device for BioExplorer® it is necessary to apply a small change to the BioExplorer designs, that will be used with BixDVD:

  1. Open the design
  2. Insert a new “Server” object into the design
  3. Connect the input pin of the new Server object to the output pin, that connects to the DVDPlayer.
  4. Optionally - if you are sure that you do not need the DVD Player anymore - delete the DVD Player object from the design.

The same in detail:

1.     In the BioExplorer® menu click “Design” then “Open”.
Chose an appropriate design (i.e. one that uses DVDPlayer as output).

2.     In the BioExplorer® menu click “Design” then “Add Object…”.
new object
Mark the Server object and click “Add”.

3.     Look 
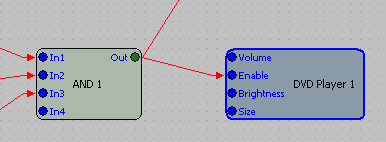
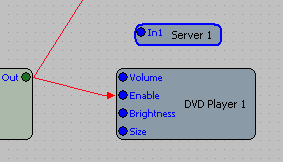
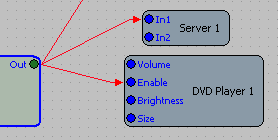
for the DVDPlayer object in the design. It could look something like this:
Design Graphic 1
Drag (move with the mouse) the new Server object near to the DVDPlayer (the Server object is in the upper left corner!):
Design Graphic 2
Now connect the Server object to the Out pin of the sending object ("AND 1"): Click on the green spot, then while still pressing the mouse key pull it over to the “In1” Pin of the Server object and release it there exactly on the blue point..
Design Graphic 3
A red line will be shown between “Out” and “In1”, the connection is made.

4.     If you want to (optionally!) delete the DVD Player object, mark it with a mouse click, then press the Del (Delete) Key on the keyboard. Be aware that with deletion of the DVDPlayer also the corresponding video window in the instrument panel is deleted.

Running BixDVD

BixDVD can be started from the Windows Start Menu | Programs | BixDVD. It will first look for a running BioExplorer® instance, then start with the Main Form in minimized mode (Settings are not shown). As soon as it receives the signals from BioExplorer it is ready to provide feedback through the DVD player. The LED will turn green. Now press the button Control to activate neurofeedback inhibits.